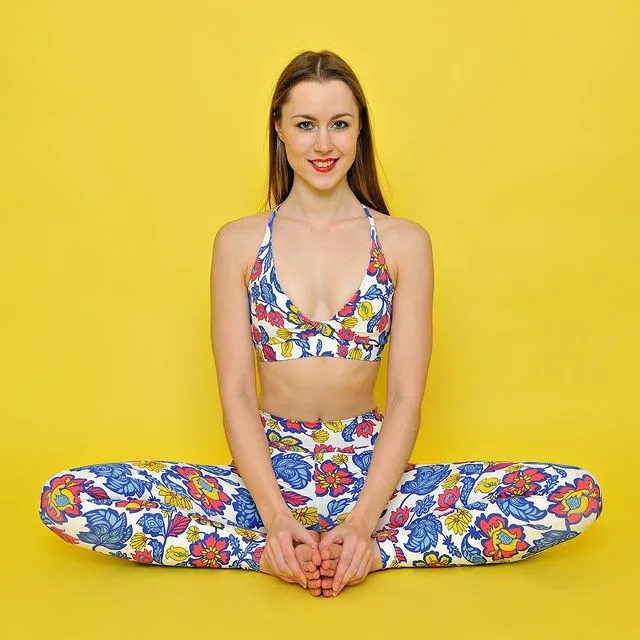
Baddha Konasana, also known as Bound Angle Pose (a.k.a. Cobbler Pose), is a great hip opener and a recommended precursor to standing poses and twists.
Experts believe that regular practice of Baddha Konasana (Bound Angle Pose) activates the lower abdominal organs, heart and blood circulation. For women, this pose can help relieve menstrual pain and menopausal symptoms. The pose can also reduce high blood pressure and relieve asthma symptoms.
In addition to opening the hips, Baddha Konasana (Bound Angle Pose) can stretch the waist, knees and inner thighs. Good for a relaxing meditation once.
Information
| Known as: | Baddha Konasana, Bound Angle Pose, Butterfly Pose, Cobbler Pose, Bhadrasana, Tittali Asana |
| Sanskrit name: | बद्धकोणासन |
| IAST: | Baddhakoṇāsana |
| Pronunciation: | BUH-duh ko-NAHS-uh-nuh |
| Level: | Beginner |
| Type: | Seated, Hip opener |
| Total time: | 5 minutes |
| Drishti: | Forward; Eye closed; Nose (Nasagrai or Nasagre); Third eye, between the eyebrows (Bhrumadhye or Ajna Chakra) |
| Chakra: | Swadisthana Chakra, Muladhara Chakra |
| Focus: | Hips |
| Indications: | High blood pressure, asthma, depression, anxiety, fatigue, blood circulation, menstrual pain, menopause |
| Counterpose: | Paschimottanasana, Bridge Pose |
| Preparatory poses: | Sukhasana, Supta Padangusthasna, Virasana, Tree Pose, Upavistha Konasana |
| Follow-up poses: | Vrksasana, Any forward and twisted pose can be done |
| Contraindications: | Hip pathologies, sacroiliac injury, coccyx injury, knee injury, groin injury, or inguinal hernias |
Meaning + Origin
The Baddha Konasana is derived from the Sanskrit name, which is made up of three words — Baddha + Kona + Asana:
- “Baddha” = “bound or restrained”
- “Kona” = “angle”
- “Asana” = “pose or posture”
Baddha Konasana is believed to have originated in the typical sitting position of the Indian cobbler, which is one of its other names, the Cobbler’s Pose.
A slight change in this posture in the form of upward and downward movement of the bent legs turns it into Butterfly Pose.
The ancient reference to Baddha Konasana is usually derived from the Hatha Yoga Pradipika, an ancient yoga text of the 15th century.
Benefits of Baddha Konasana (Bound Angle Pose)
Deep breaths in Baddha Konasana (Bound Angle Pose) can be helpful in increasing your vital abilities, which can further aid in respiration. Regular practice of this asana provides a deep stretch in the area governed by the sciatic nerve and provides relief from symptoms.
However, the physical and mental benefits of Baddha Konasana (Bound Angle Pose) are listed below:
- Physical Benefits:
- Stretches the groin muscles and adductor muscles
- Frees hip joints
- Improves circulation through hips, legs, and pelvic region
- Strengthens back and spine
- Relieves sciatica and keeps the sciatic nerve in control
- Increases flexibility in the tendons and muscles of the knees and hips
- Improves posture
- Improves upper back posture (rounded shoulders)
- Stabilizes the pelvis and mobilizes the spinal joints
- Massages the abdominal organs
- Very helpful in menstrual disorders and pregnancy
- Maintains a state of the kidneys, prostate, and urinary tract health
- Prevents hernia
- Cures hemorrhoids
- Mental Benefits:
- Reduces stress and anxiety
- Builds focus and concentration
Baddha Konasana (Bound Angle Pose) Practice Guide
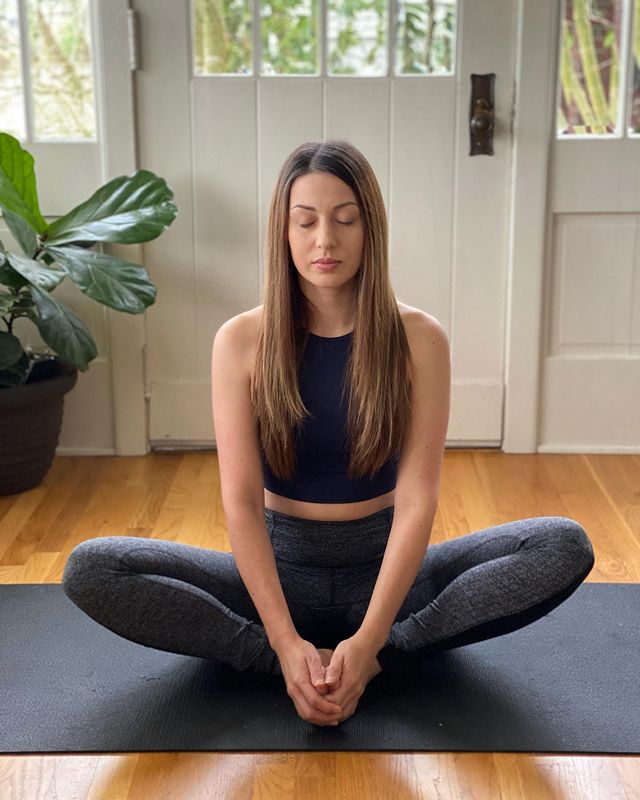
Instructions
- Start in the Dandasana (Staff Pose). Exhale, bend your knees and draw your heels in toward your torso. Clasp your feet with your hands, pressing the soles of your feet together. As your knees bend, let them fall on either side of the body. Draw your heels as close to your pelvis as you can, and point your toes up and apart.
- You should sit so that your pubis and tailbone are at the same distance from the ground. Lengthen the front of your chest while keeping your shoulders back and your breastbone lifted. Allow your thighs to move towards the ground.
- Stay in this position for 1 to 5 minutes. To get out of this position, inhale, slowly bring your knees together and return your legs to the starting position.
Beginners’ tip
Maintain optimal neutral posture and lower your knees to the mat minimally. Gaze at the tip of your nose. Maintain the posture for 5 minutes.
Intermediate tip
Maintain optimum posture, core lock and Mula Bandha. Lower your knees as close to the mat as possible. Gaze at the tip of the nose. Maintain the posture for 5 minutes.
Step-by-step Anatomy Engaging Techniques
Step-1
- Flex your knees by engaging your hamstrings. Contracting your hamstrings not only causes your knee to bend, but also tucks your tailbone under, as your hamstrings originate from the posterior ischial tuberosities of your pelvis.
- Remember that in Baddha Konasana (Bound Angle Pose) your hips rotate outward; Tucking your tailbone under causes your hips to turn outwards and synergizes the external rotation.
- Your sartorius muscle runs from the front of your pelvis to your inner knee. It flexes your hip, abducts and externally rotates your hip.
- When contracted, your sartorius feels like a cord in the front of your pelvis. Its name derives from the Latin for “tailor”, as tailors used to sit cross-legged while working. Note that this muscle also crosses your knee and thus helps your hamstrings to flex and stabilize this joint in the pose.
- Engage your psoas to flex and rotate your hips externally. An indication of this action is to press your hands to the knees and then try to pull them towards your body, resisting with your hands.
Step-2
- Squeeze the sides of your buttocks to perform the abduction and externally rotate your hips, drawing your knees toward the floor.
- Your gluteus maximus externally rotates your hips, while your gluteus medius and tensor fascia lata abduct them. Activating these muscles stimulates reciprocal inhibition of your adductor group on your inner thighs, allowing them to relax in the stretch.
- You may note a contrast in the contraction of your gluteus medius and tensor fascia lata, as they internally rotate your hips. The primary action of these muscles in Baddha Konasana (Bound Angle Pose) is to abduct your femur. Some fibers of these muscles also need to be stretched to allow external rotation.
- Note that when your hips are fully abducted, the contractile force of your tensor fascia lata and gluteus medius is far less, as these muscles shorten almost entirely. At this point, it becomes necessary to engage your hamstrings and use your hands to bring your feet closer to the pelvis and your knees closer to the floor.
- Your gluteus medius, tensor fascia lata, and gluteus maximus (the fibers that connect to your iliotibial band) work together to provide that extra inch of abduction in the pose.
- Your iliotibial band is a fibrous ribbon-like tendon that runs from your upper thigh to just below your knee. Both your tensor fascia lata and gluteus maximus are involved. It abducts your hip and stabilizes your knee.
Step-3
Flex your elbows by contracting your biceps and brachialis muscles. This draws your heels closer to your pelvis. Then engage your muscles as described in Step-4 and Step-5.
Step-4
Pull your shoulders down along your lower trapezius and use your rhomboids to move your shoulder blades in toward the spine. Notice how it expands your chest forward and hands grasp your feet to bring the heels closer to your pelvis. Combine this action with extending your back as described in Step-5.
Step-5
- Activate your erector spinae and quadratus lumborum muscles to sit up straight and tall. Engaging these muscles transmits a force to your hands, which hold your feet, and draws your feet closer to your pelvis, increasing the stretch of the adductor group on your inner thighs.
- Note that your lower back arching also tilts your pelvis forward, pulling your hamstrings at their attachment on your sitting bones and drawing the lower legs closer to your thighs.
Bound Angle Pose Half Forward Bend Variation
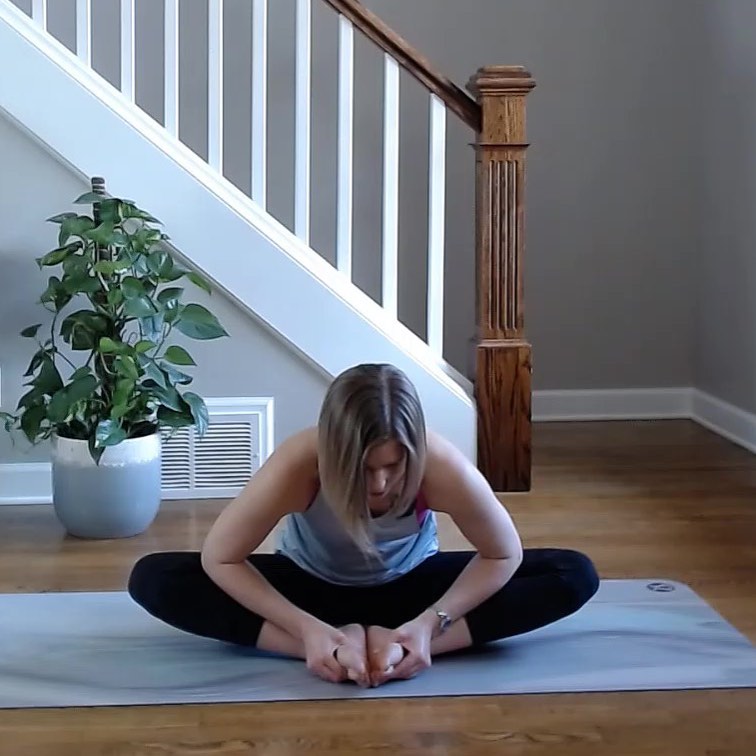
Instructions
- From the preparatory position for Upavistha Konasana, bend your knees to bring your feet together.
- If you feel knee strain, then reduce your knee strain by placing a block under your knee or under your both knees.
- Press your hands into the floor behind your hips to help rotate your pelvis forward.
- If able to sit tall on your sitting bones with your hands off the floor, clasp and open your feet like a book, pressing your heels together while stretching your knees out toward the floor.
- Rotate your pelvis forward to draw your heart center toward your horizon.
- As a variation, extend your arms fully forward, palms pressing down, using this alternative positioning to leverage the lifting of your heart center, elongation of your spine, and deeper forward rotation of your hips.
- Keeping your sitting bones rooted, heels pressing together, shoulder blades down the back, heart center open, move with the breath to lengthen your spine while folding forward from your hips.
- Use your elbows to press your thighs back, knees out, and chest forward.
- Create a feeling of bringing your belly button toward your toes, sternum to your horizon. Cueing this action will minimize the rounding of your back and reduce potential strain in your lower back and neck.
- If you feel pain in your inner knee or groin, then place blocks under your knees.
Bound Angle Pose Forward Bend Arms Straight Variation
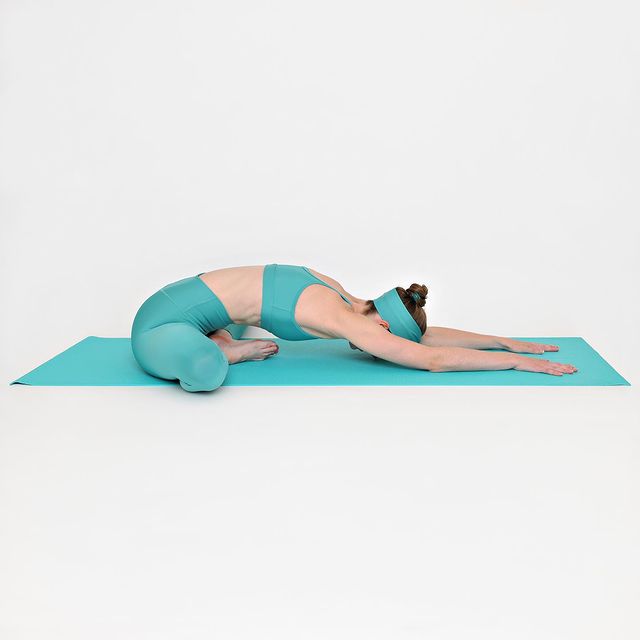
Instructions
Step-1
Sit erect on the floor with your legs bent and the soles of your feet together. Then press the soles of your feet firmly together, stretch your inner thighs toward your knees, and gently press the knees toward the floor. Pressing your feet together helps move your knees outward, and because they’re moving outward, they’ll slide downward more easily.
Step-2
Align your torso and extend your core. Pull your spine straight. Press down firmly on the sit bones as you bring your lower back in and lift your chest. Pull with the hands, using the strength of the hand to help you do this. Drive your shoulders backward, flatten your shoulder blades into your back, and then keep your abdominals in as you’re trying to lengthen your core. Go straight up through the crown of your head and straight downward through your sitting bones. Breathe smoothly.
Step-3
Rotate the pelvis forward and place your hands on the floor in front of you. Extend your fingers, rest your palms on the floor, and then arch the buttocks back to position yourself on the front edge of your sitting bones.
Step-4
As you inhale, bring the lower back forward, lengthen the arms and lift the spine. Lengthen the front part of your body. Try to achieve maximum spinal extension. Move the coccyx and fontanel away from each other.
Step-5
As you exhale, slide your hands forward into the pose. Slide the hands forward until you see a new edge, then stop. Breathe in slowly as you wait for the stretch to subside, then exhale and bend deeply. Keep moving your hands away from you. Proceed slowly, edge to edge. Do this until you can no longer move the hands. In the end, your chest will rest on your feet, your forehead on the floor.
Step-6
The way to be flat is to be tall, and the way to be tall is to slide your hands away from you. Do not rush to the maximum expansion. The slower you go, the deeper you get. Keep the palms flat, keep the arms straight and relaxed, and pull them out through your knees, squeezing them down. Maintain maximum extension from coccyx to fontanel to fingers.
Step-7
Direct the gaze towards the floor. Do not shorten the back of the neck by lifting your head and looking forward. Direct your energy flow outward through the crown of the head and arms.
Step-8
Breathe smoothly. Feel the pulse of your body with the gentle rhythm of your breath. Stay here for 1 to 5 minutes, then release from the pose.
Precautions and contraindications
Baddha Konasana (Bound Angle Pose) stretches the muscles below your thighs with some intensity and should be practiced carefully while keeping your waist and neck straight. Also, don’t push the knees down with the hands. Just let the stretch happen naturally.
Do not practice Baddha Konasana (Bound Angle Pose) if you experience: Hip pathologies, injuries to the sacroiliac or coccyx, groin injuries, or inguinal hernias. However, asanas have a primary effect in these parts.


