The Tortoise pose is named after an animal that hides in its shell when it is alarmed or threatened. Tortoise pose also called Kurmasana (Sanskrit- कूर्मासन). This asana is pronounced as Koohr-Mah-Sah-Nah.
An intermediate/advanced seated forward bending pose that looks like a turtle upon entering full posture. This asana performed mostly in Hatha Yoga and Ashtanga Yoga.
It deeply extends the legs, especially the thighs and hamstrings. And the Tortoise pose aka Kurmasana also helps in removing abdominal fat and tone the abdominal muscles.
Regular practice of this yoga pose helps to connect with your inner self, and you will feel energetic. Due to the nature of the deep stretch involved in turtle posture, previous experience with flexibility is recommended.
Information
| Known as: | Tortoise Pose, Kurmasana, Turtle Pose |
| Sanskrit name: | कूर्मासन |
| IAST: | Kūrmāsana |
| Pronunciation: | koor-MAH-sah-nah |
| Level: | Intermediate |
| Type: | Forward-bend Pose |
| Total time: | 30 to 60 seconds |
| Drishti: | At fingertips; Forward; Eyes closed |
| Chakra: | Manipura Chakra |
| Focus: | Legs, back, shoulder, arms |
| Indications: | Insomnia, constipation, headache, asthma, flatulence, diabetes and obesity, digestive and respiratory problems |
| Counterpose: | Uttanasana (Standing Forward Bend Pose), Cow Face Pose (Gomukhasana), Sphinx Pose (Salamba Bhujangasana), Upward Facing Dog (Urdhva Mukha Svanasana), Child’s Pose (Balasana), Seated Forward Fold (Paschimottanasana) |
| Follow-up poses: | Chakrasana (Wheel Pose), Bow Pose (Dhanurasana), Bhujangasana (Cobra Pose), Matsyasana (Fish Pose), Shoulderstand (Sarvangasana), Pigeon Pose (Kapotasana), Camel Pose (Ustrasana) |
| Contraindications: | High blood pressure or low blood pressure, Headache, Neck injuries, Shoulder injuries, Lower back issues, Pregnancy |
Meaning
Kurmasana is a Sanskrit term that is made from two words—Kurma + Asana—commonly used to refer to Tortoise pose in yoga.
- “Kurma” = “turtle” or “tortoise”
- “Asana” = “pose” or “posture”
Therefore, the term Kurmasana literally translates to “Tortoise pose.”
In Hindu mythology, Kurma is believed to be the second avatar of Lord Vishnu, the preserver of the universe. According to the myth, when the gods and demons churned the ocean of milk to obtain the elixir of immortality, Kurma appeared as a giant tortoise to support the mountain that was being used to churn the ocean.
The symbolism of Kurmasana is similar to that of Tortoise pose, representing the qualities of patience, wisdom, and self-awareness. Practicing this pose can help individuals access their inner stillness, cultivate a sense of grounding and stability, and release tension in the back and neck.
In addition to the physical benefits, Kurmasana is believed to activate the Vishuddha chakra, which is the throat chakra and is associated with communication and self-expression. Practicing this pose can help individuals access their voice and speak their truth with confidence and clarity.
Overall, Kurmasana is a powerful pose that can help individuals connect with the wisdom and stillness of the tortoise, while also building strength and flexibility in the body.
What are the benefits of Tortoise pose?
Many advanced stretching poses require sufficient flexibility to practice proper form. To master this pose and experience the benefits, one may have to do a lot of stretching and regular exercise. Benefits of Kurmasana/Tortoise pose include:
- Stimulates the stomach organs and improves digestive and respiratory problems
- Extends the spine and lengthens the back muscles
- Stretches arms, shoulders, back, legs and hips
- Relieves stiffness in your lumbar and sacroiliac areas
- Relaxes shoulder, head and neck during asana
- Therapeutic for insomnia, constipation, headache, asthma, flatulence, diabetes and obesity
- Increases blood flow in the body and helps improve memory power
- Builds focus
- Cultivates poise
- Develops willpower
- Calms the mind
- Improves balance
When to practice?
Make sure you practice Kurmasana on an empty stomach in the morning. The Brahma Muhurta, which is about an hour before sunrise, is the best time to practice kurmasana as the mind is naturally relaxed, making it easier for you to pull your mind and body inward.
Since it is not possible to get up at 5 am daily, you can practice Kurmasana in the evening as well. But make sure there is an optimal difference of 4-6 hours from your last meal.
In the evening, you may have to spoil your mind before getting into the pose. Otherwise, it becomes difficult to stay focused and embark on an inward journey.
Preparatory sequences for Tortoise pose or Kurmasana
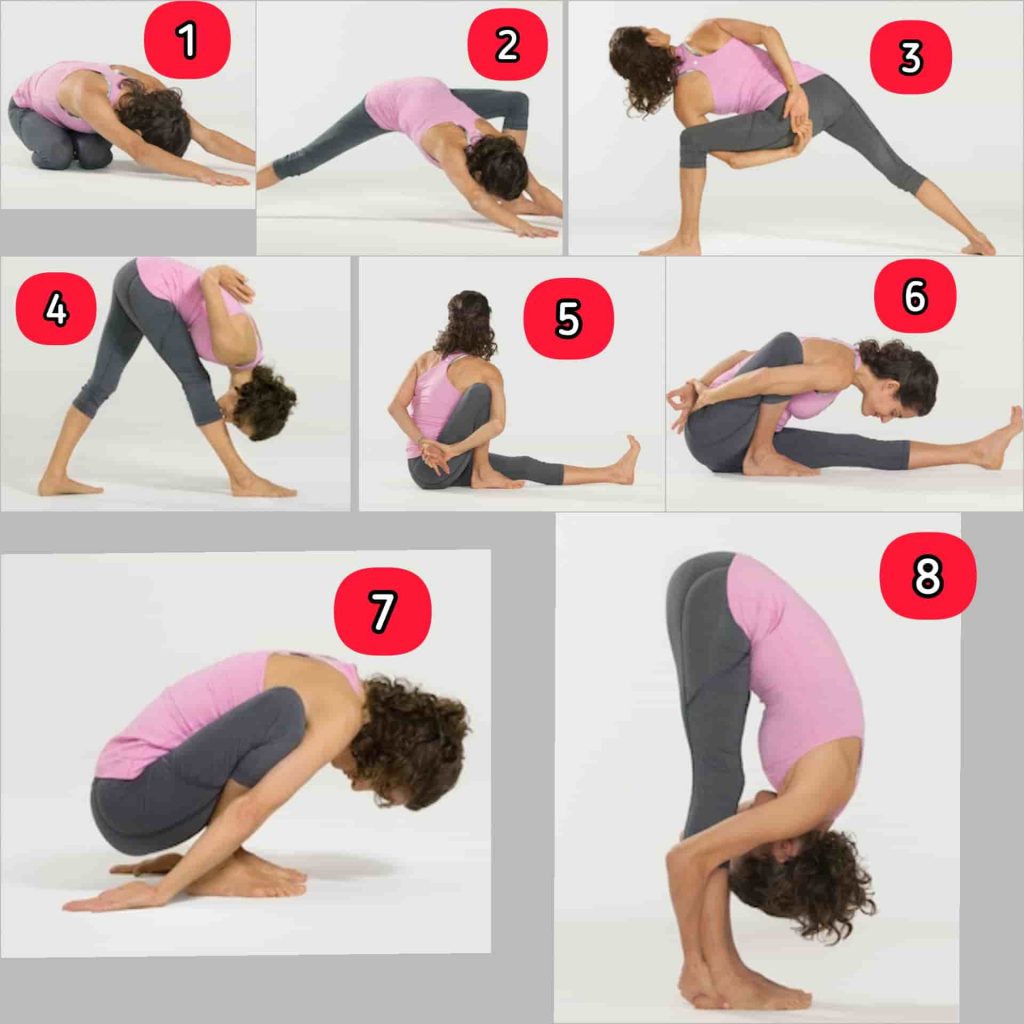
The practice of Kurmasana is the practice of respecting its boundaries. These boundaries vary from day to day, so you need to constantly look at your body and mind and make sure that you are not fighting against your limits. To overcome them, work slowly, make adequate preparations.
On your way to Kurmasana, you can lean forward more, and repeat if necessary. And that’s fine if you never meet for the full expression of the pose. Kurmasana or the Tortoise pose teaches us tolerance and compassion for ourselves, as well as for others.
8 Preparatory sequence poses to master in this pose:
- Adho Mukha Parshva Vajrasana (Downward-Facing Thunderbolt Twist)
- Downward Facing Dog Pose To Low Lunge Pose (Adho Mukha Svanasana Anjaneyasana)
- Baddha parsvakonasana (Bound Side Angle Pose)
- Parshvottanasana (Pyramid Pose or Intense side stretch pose)
- Marichyasana I variation (Sage’s Twist variation)
- Marichyasana I (Sage’s Pose)
- Malasana (Garland Pose)
- Uttanasana (Standing forward bend pose)
Tortoise Pose or Kurmasana Practice Guide
Kurmasana is often performed on a yoga mat, although you can also practice on a soft surface such as carpet floor. No equipment is required, but a yoga strap can come in handy for beginners, who need the help of stretching.
Step-by-step instructions
- Start in a sitting position. Your back should be straight, and your legs should be extended in front of you.
- Flex your feet so that your toes are pointed toward the ceiling. Push your thighs into the ground.
- Spread your legs apart shoulder width. Bend your knees a little more than one inch from the ground.
- This should bring your feet closer to you as you pull your body inward.
- Keeping your arms between you, keep your arms in front of you.
- Gently bend your torso. As you lean forward, slide each of your arms outward, keeping the palms facing down.
- Your arms should naturally slide under your slightly raised knees. Keep your elbows closed and hands close to the ground.
- Bring your chest and head forward, opening your shoulders as you pull your upper body closer to your lower body. Keep your head down until your chin touches the ground.
- Once your arms are spread on both sides and your head is completely down, straighten your legs. Your knees should no longer be bent, although your feet should still be in a flexible position.
- When you are attracted inward, extend your gaze in front of you. Relax and take deep breaths.
- Concentrate while pressing your thighs to your arms, which should invoke a feeling of comfort and comfort.
- Allow your thoughts to move from the outer world to your inner world. Eliminate pressure, stress and tension both physically and mentally.
- Hold the pose for about 30 seconds while taking gentle breaths.
- To release the pose safely, bend your knees and lift it from the upper body. Draw your arms towards you and rest on the torso.
Step-by-step Anatomy Engaging Techniques
Step-1
- Contract your abdominals to flex your trunk. Activate your psoas to flex your femurs. Your psoas major originates from your lumbar spine and, as such, aids to draw your trunk deeper into the pose.
- Be aware, however, that your hips are fully flexed and that your hip flexors have limited capacity to contract further and add to this movement. In situations like this, you can connect your upper and lower extremities to deepen the pose.
Step-2
- Place your arms under the legs with your palms on the floor. Press your mounds at the base of your index fingers down to pronate your forearms, using your pronator teres and quadratus muscles.
- As you enter the pose, extend your elbows by contracting your triceps to deepen the placement of your arms under the legs.
- Attempt to lift your elbows and upper arm bones against the backs of your legs. This engages your lateral and posterior portions of your deltoids, flexing your trunk deeper.
- Draw your shoulders away from your ears by contracting the lower third of your trapezius.
Step-3
- Straighten your knees by activating your quadriceps. This presses your legs onto the backs of your arms and creates an intense stretch of your back muscles and of your gluteus maximus, your main hip extensor.
- The pull of the stretching gluteus draws your thighs into external rotation, turning your kneecaps outward.
- Use your tensor fascia lata to counteract this by rotating your femurs inward. The cue for this is to press your heels into the mat and attempt to drag your feet apart.
- Your feet will not move because they are constrained on the mat, but your tensor fascia lata and gluteus medius will contract and internally rotate your femurs.
- If you look under your tensor fascia lata here, you will see your gluteus minimus. This muscle synergizes your hip flexion and internal rotation and stabilizes the head of your femur in the socket. Visualize this in action when you’re practicing Turtle Pose (Kurmasana).
Step-4
Dorsiflex your ankles by contracting your tibialis anterior muscles. Your feet tend to turn inward in Kurmasana. To overcome this, lift your toes using your toe extensors and evert the soles of your feet with your peroneus longus and brevis muscles on the outsides of your lower legs. Counterbalance eversion by engaging your tibialis posterior to dynamize your arches. All of these serves to open the soles of your feet, illuminating minor chakras in this region.
Step-5
- Pronate your forearms with your pronators teres and quadratus.
- Engage your flexors carpi radialis and ulnaris to flex your wrists.
- Attempt to bend your elbows by contracting your biceps and brachialis muscles.
- It protects them against hyperextension and deepens the pose via closed chain contraction of your biceps.
- Engage your quadriceps to straighten your knees and press your thighs into the backs of your arms, flexing your trunk further. This illustrates how to produce additional movement in your hips and pelvis by connecting your arms and legs.
Precautions and contraindications
It is essential to understand the precautions and contraindications associated with Tortoise pose to avoid any potential injuries or discomfort. While Tortoise pose can have many benefits, including improving flexibility and circulation, there are also some precautions and contraindications to keep in mind. These include:
- Neck injuries or issues: Tortoise pose involves placing significant pressure on the neck and cervical spine. As such, individuals with neck injuries or issues should avoid this pose or modify it to reduce the pressure on the neck.
- Shoulder injuries: Tortoise pose requires a significant amount of shoulder flexibility and strength. Individuals with shoulder injuries or issues may find this pose challenging or painful and should avoid it or modify it to reduce the pressure on the shoulders.
- Lower back issues: Folding forward in Tortoise pose can place significant pressure on the lower back. Individuals with lower back issues or injuries should avoid this pose or modify it to reduce the pressure on the lower back.
- High blood pressure: Tortoise pose involves holding the breath, which can cause a temporary increase in blood pressure. Individuals with high blood pressure should avoid holding their breath and modify the pose to avoid any sudden or rapid movements.
- Pregnancy: Women who are pregnant should avoid Tortoise pose, as it can place too much pressure on the abdomen and uterus.
It is better to discuss with your doctor before practicing this asana if you have any recent medical concerns. It is advisable to practice this pose under the guidance of a yoga teacher.
Variations of Kurmasana
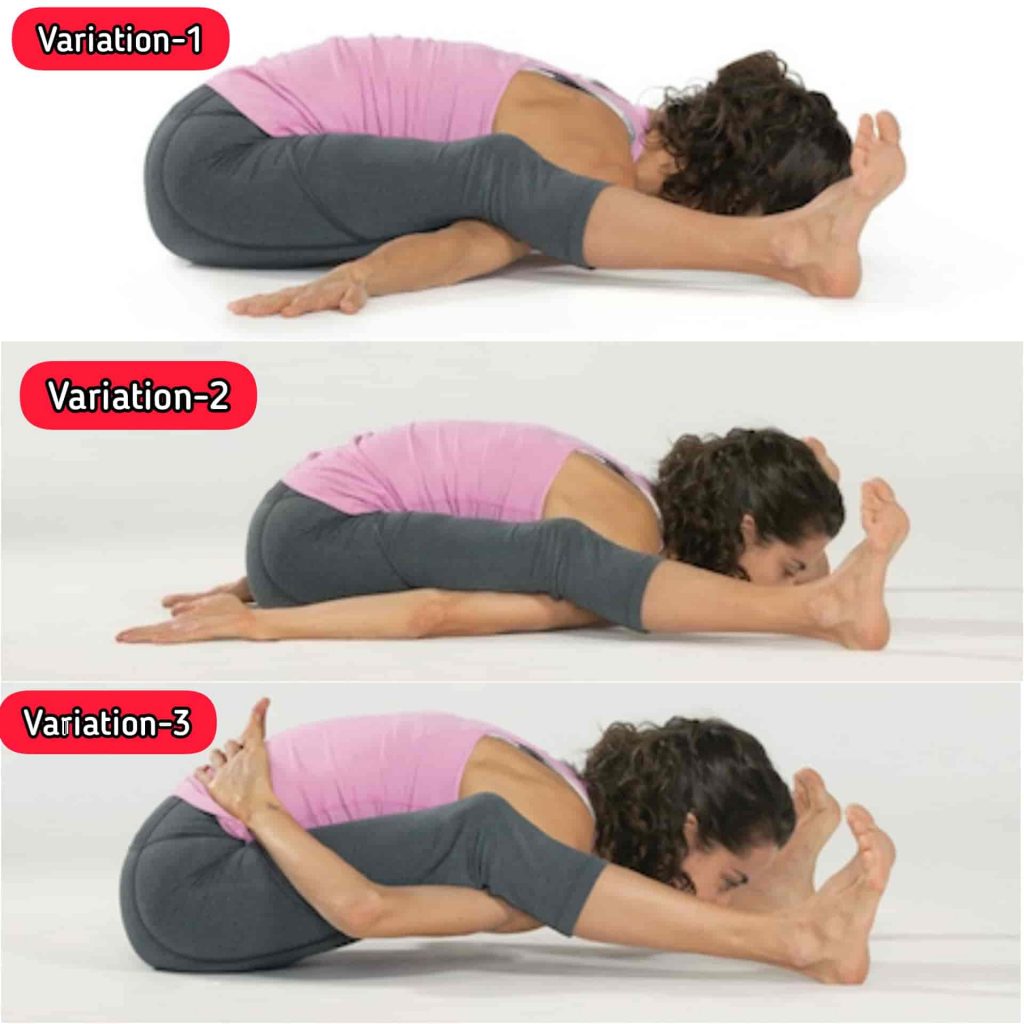
Variation-2, move your arms behind you with your palms, just as you did them in Malasan.
Variation-3, bend your arms, bend your elbows, and place your hands around the back of your waist.
The tendency in this posture is to stretch the legs too much, making stiffness impossible. This asana is a symbol of retreat and drawing, so counteract the common fallacy by keeping your shoulders under your legs, with your shoulders upward, and your shoulders together, firming your upper inner thighs.
The more you pull your hands away from your body, the more easily you will be able to hold them. Once you swagger, work the bones of your hand towards the back of the body as if you were back-bending into your shoulders. Stop and release Kurmasana for 30 seconds to 1 minute.
Release pose safely: To come out of an intermediate or advanced yoga pose requires almost as much effort as being in the posture. In the case of turtle posture, the back and hips are endangered by releasing the posture indiscriminately. Begin releasing the pose by bending your knees and raising them to a point that allows you to retract your arms. Once your arms are free, you can lift your torso and return to a sitting position.


